Like all other firewalls, Windows Defender Firewall acts as a barrier and gatekeeper, monitoring incoming and outgoing network traffic and allowing or blocking it based on security rules. Through its advanced security features, users can also configure the firewall to block a program.
How to block a program in Windows Firewall
Blocking a program with Windows Firewall is straightforward if you have the right steps. The process is very similar for Windows 10 and 11. Here is how to block a program in six simple steps.
1. Open Windows Defender Firewall
The first step involves accessing the Windows Firewall Advanced Setting configuration, where you will make the necessary adjustments and configure the firewall to block a program of your choice.
There are many ways to open the Windows Defender Firewall. You can open it through the search bar at the bottom left of your screen or open the Run window by pressing the Windows + R keys and typing in WF.msc.
To access Windows Defender Advanced Settings:
- Open Windows Defender Firewall by searching or using run commands.
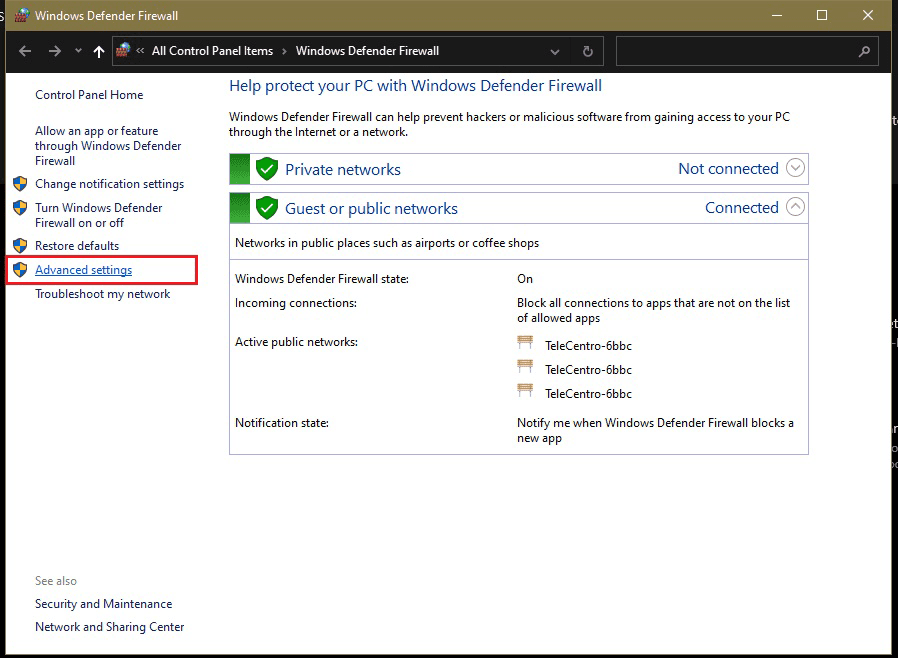
- On the left menu of the Windows Defender Firewall window, click on Advanced Settings (Figure A).
2. Access Outbound Rules
As previously mentioned, Windows Firewall works through a set of security rules. While most users keep the default settings, the Windows Defender Firewall is much more sophisticated and can be customized.
Creating inbound and outbound (network traffic) rules is one of the main features that can strengthen security and create isolated digital architectures.
In this step, you will access the outbound rules to block a program with the firewall.
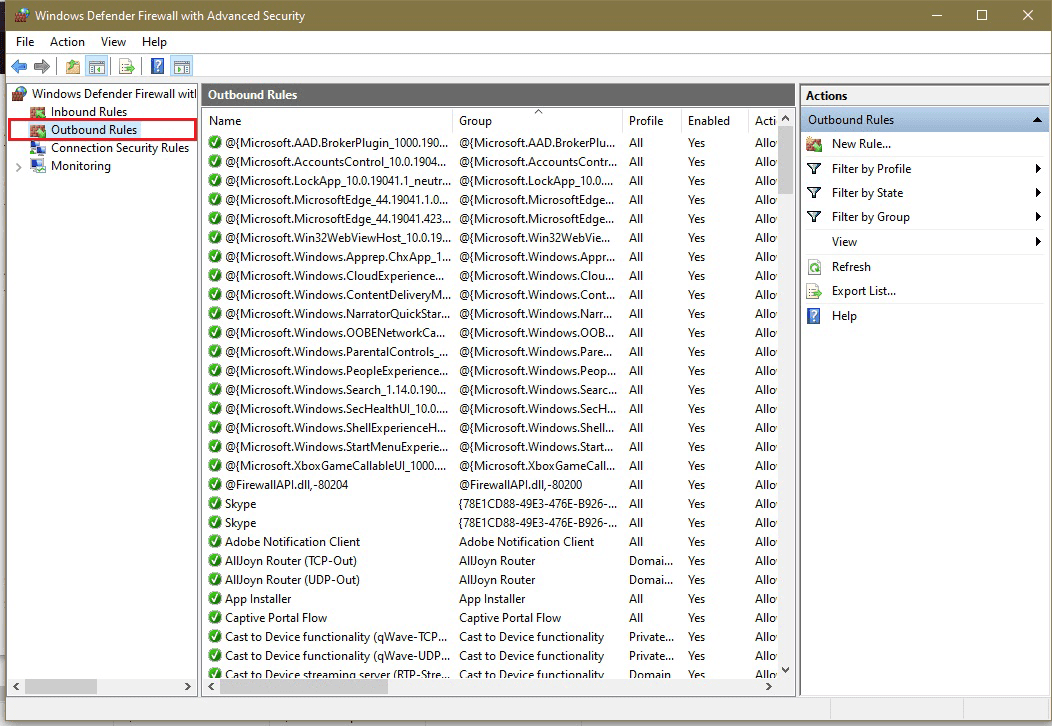
To do this, click on Outbound Rules in the left pane of the Windows Firewall window (Figure B).
3. Create new Outbound Rule
Creating firewall rules may seem overwhelmingly technical for nonadvanced users. However, if you follow the following steps, it can be a simple and effective way to block programs.
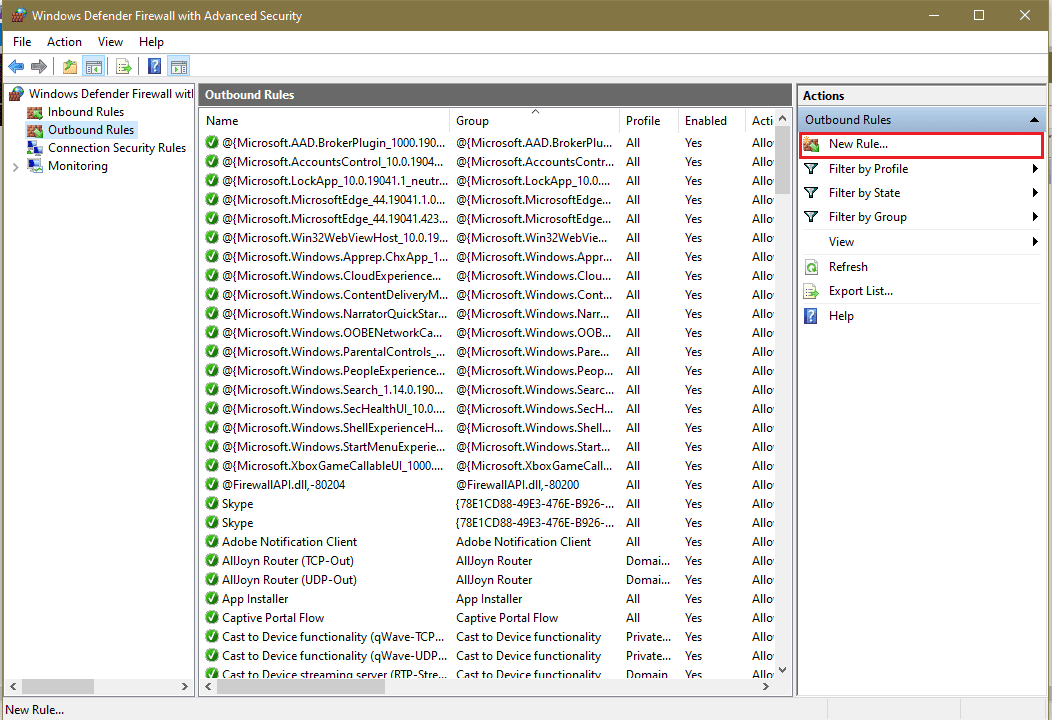
To create a new outbound rule, click on New Rule… under Actions in the right pane of the Windows Firewall window (Figure C).
4. Select Program from the Rule Types
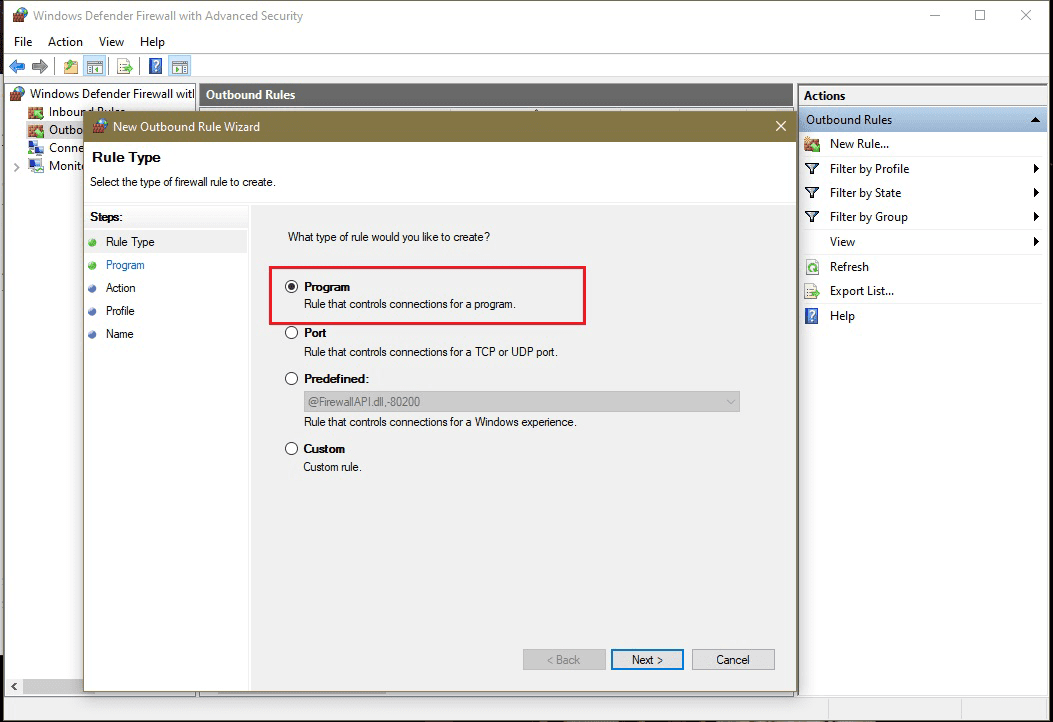
This step is essential, as it defines what type of rule you want to create. Once you click New Rule…, you will see four options: Program, Port, Predefined, and Custom. Each option serves a different function:
- Program rules block or allow apps and software.
- Port rules control connections for TCP or UDP ports.
- Predefined rules control connections for the core Windows experience.
- Custom rules are those that a user customizes.
Because you are trying to block a program, select Program from the four types of rules (Figure D) and click Next.
You will now have two options: To either select All programs or to block a specific program.
To block a specific program, select This program path: and click Browse (Figure E). The directory will open for you to search for the program you want to block. You’ll need to locate the .exe program file of the program you wish to block.
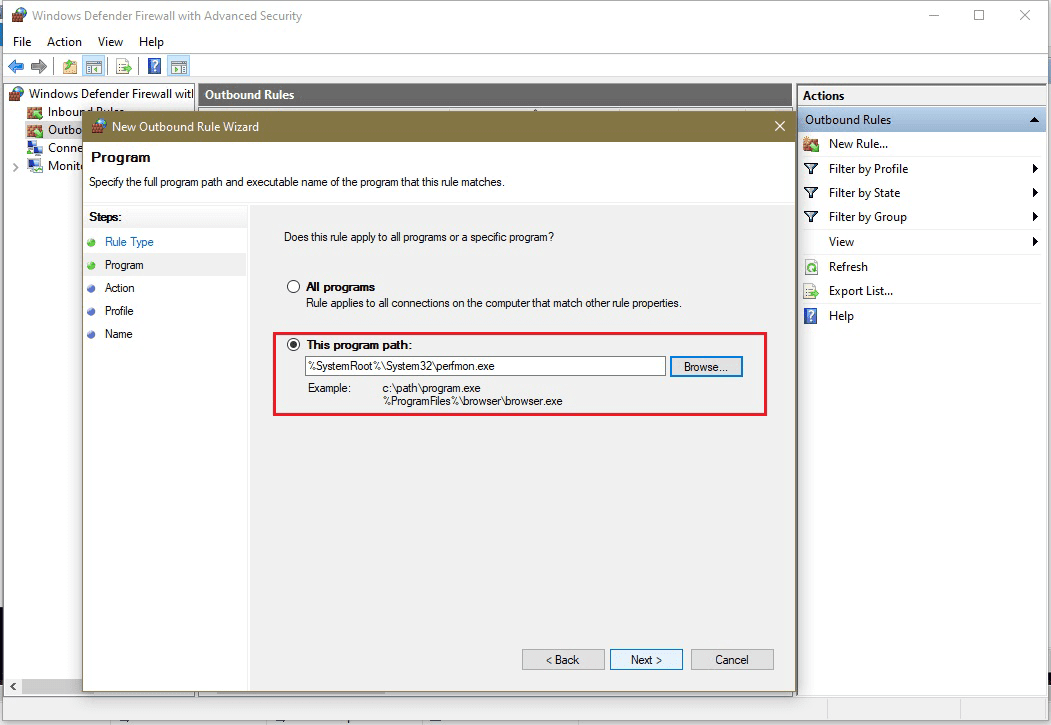
Once you have located and selected the program you want to block, click Next.
5. Block the connection
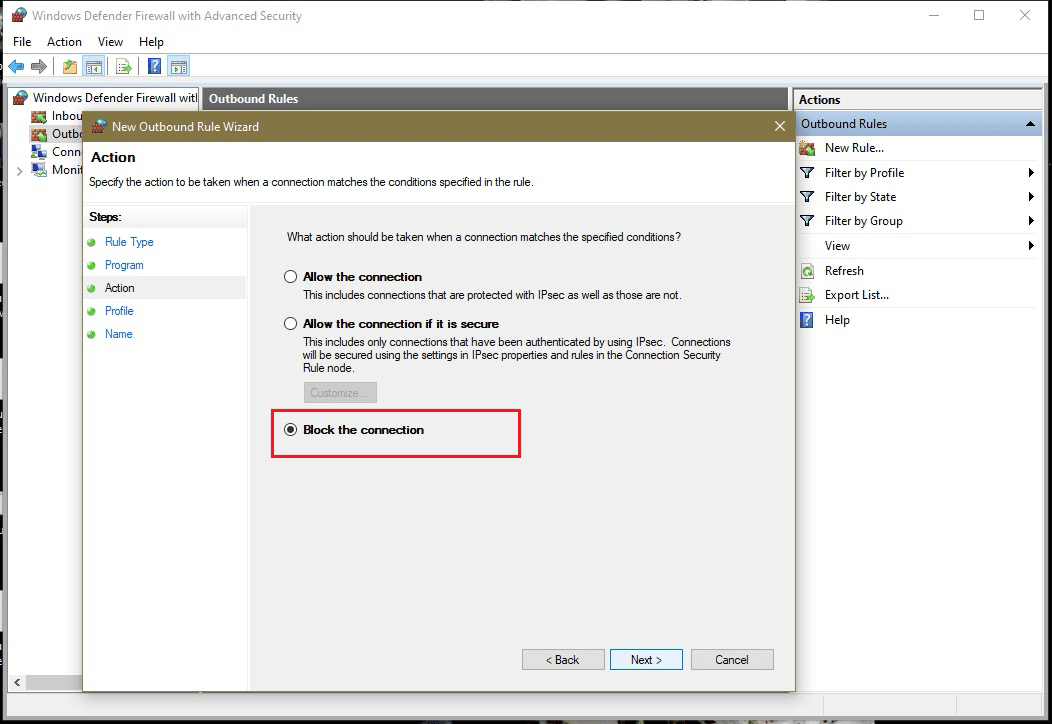
At this stage, Windows Firewall will move on to Action. You will then have three options:
- Allow the connection
- Allow the connection if it is secure
- Block the connection
Select Block the connection and click Next (Figure F).
6. Set profiles
The final step involves setting the profile and choosing a name for your rule so you can quickly identify it in the future.
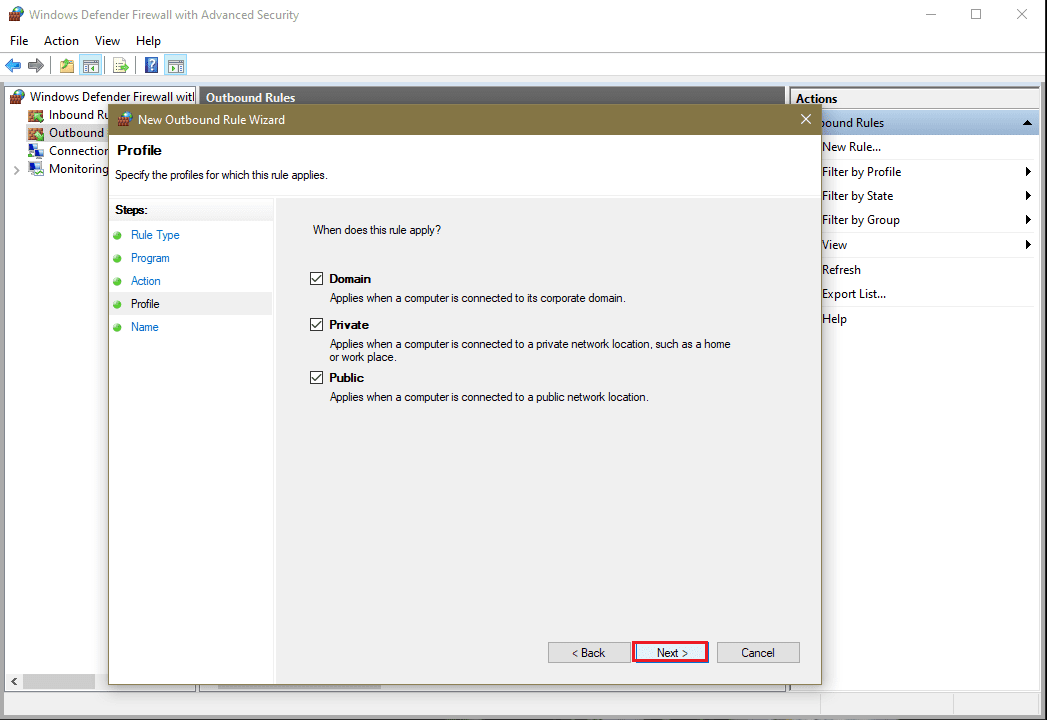
On the New Outbound Rule Wizard window, you must answer the question, “When does this rule apply?”
You can select one, two, or all three options listed:
- Domain: The rule will apply when your computer is connected to its corporate domain.
- Private: The rule will apply when the computer is connected to a private network, such as your home.
- Public: The rule will apply when connected to a public network.
Select the type of profile or profiles you want the rule to apply to, and click Next (Figure G).
7. Name the rule
Finally, you must choose a name for your rule and add a description.
Do not type in a generic name. It will only make it difficult to find when you need to deactivate or delete the rule.
Even though it’s optional, adding a description is important, especially if you are creating several rules, as it may help you remember the rule’s specifics and why you created it.
Once you’ve entered your name and description (Figure H), click Next.
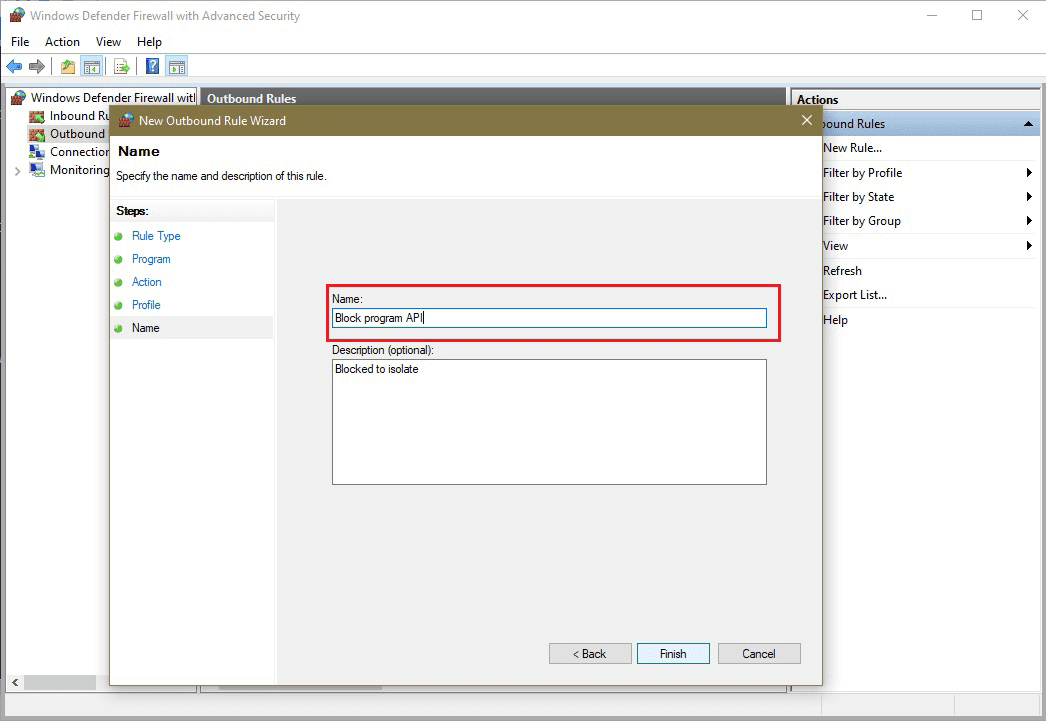
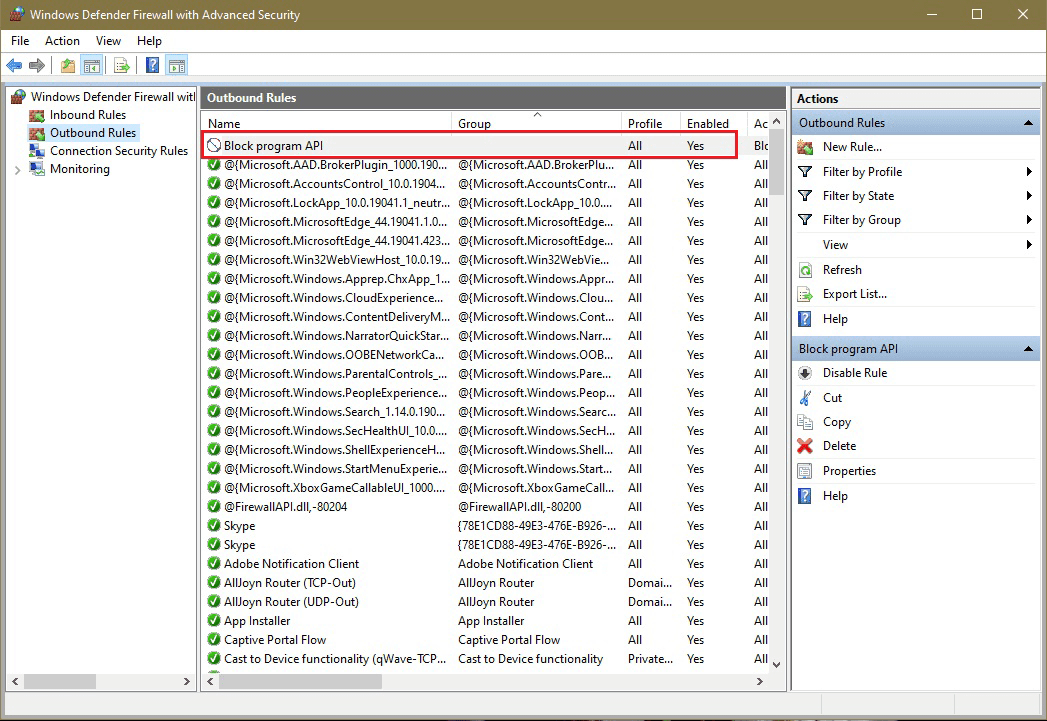
You should now see the new rule under the list of all Outbound Rules in the Windows Firewall Advanced Settings center panel (Figure I).
Can you temporarily block a program with a firewall?
You can temporarily block a program using Windows Defender Firewall’s Allowed Apps and Features tool.
To temporarily block a program:
- Open Windows Defender Firewall by searching or using run commands.
- In the left pane, click Allow an app or feature and then click on Change settings.
- You will now see a list of all your apps and programs. Search the list to find the program you want to block. If you do not find the program, use the Browse option to locate it. Then select the program and click Add to add it to the list.
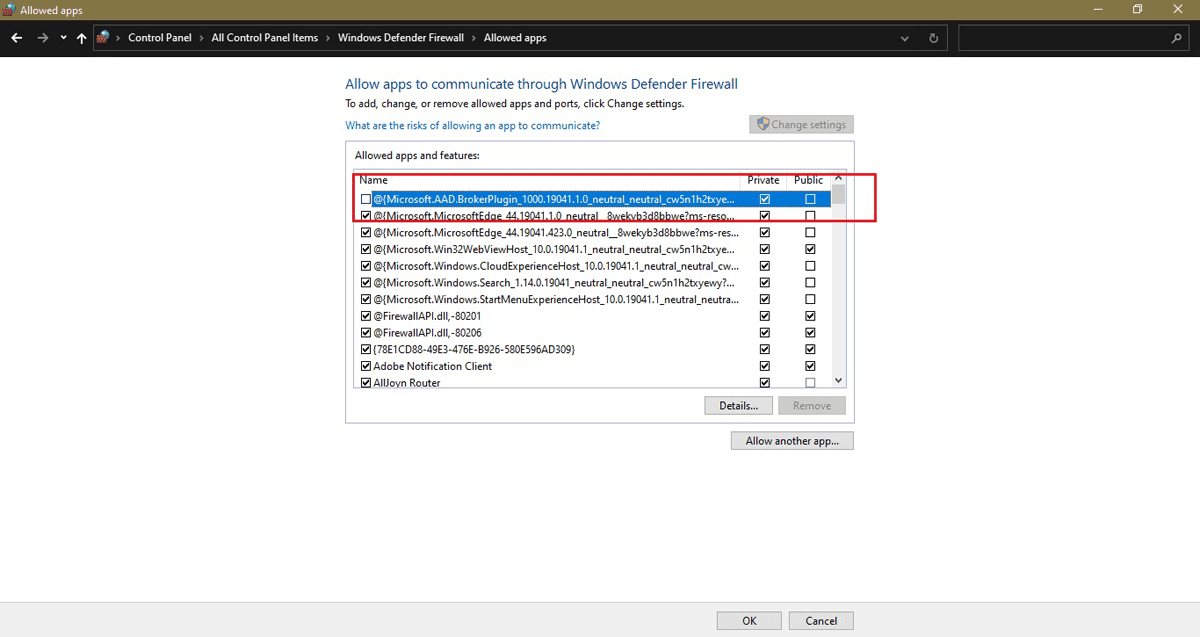
- You will notice that some of the programs in the list are checked in the left checkbox, while others are not. Those that are checked are currently allowed by Windows Firewall. Uncheck the program you want to temporarily block and click OK to save your changes (Figure J).
Note that you can decide whether to block the program on Private networks, Public networks, or both.
Bottom line: Blocking programs in Windows Firewall
Firewalls are essential for data privacy and security, and Microsoft Windows Firewall Defender has an excellent performance rate.
Though customizing firewalls may seem to be something only the most advanced users should be doing, nothing is further from the truth.
If you need to block a program, an app, or a feature, all you need to do is follow the simple steps outlined in this guide.
Thinking about moving on from Windows Firewall? We reviewed the best firewall software to protect your network.
The post How to Block a Program with Firewall in 7 Easy Steps appeared first on Enterprise Networking Planet.

